
Modifiers & Rollouts
If you are interested in the initial setup for the rollout and modifiers, read Part 1. Now we are going to dive a little deeper on how to setup your Rollouts and load in external scripts and then take them with us to another computer.
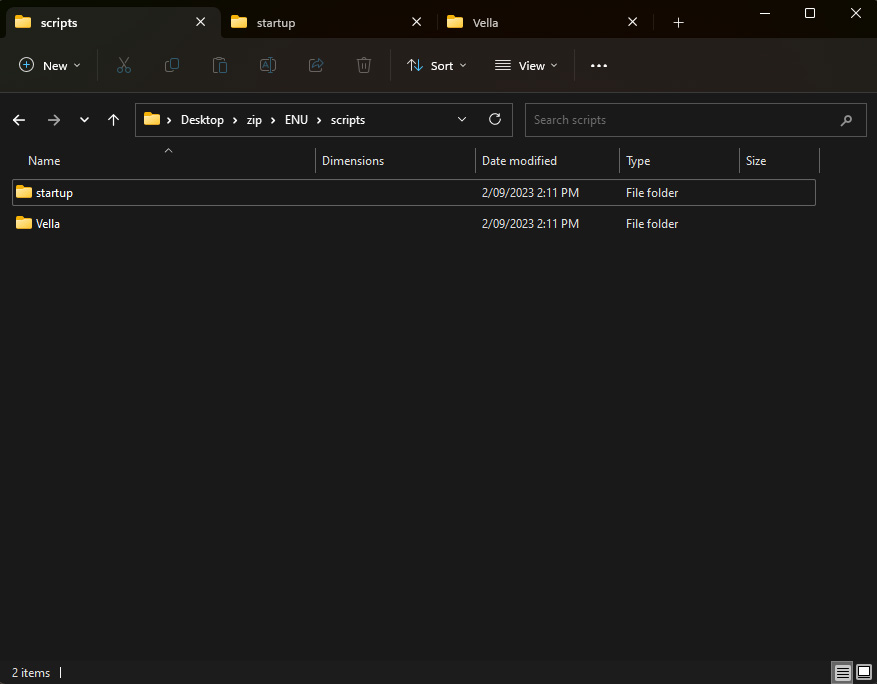
Files
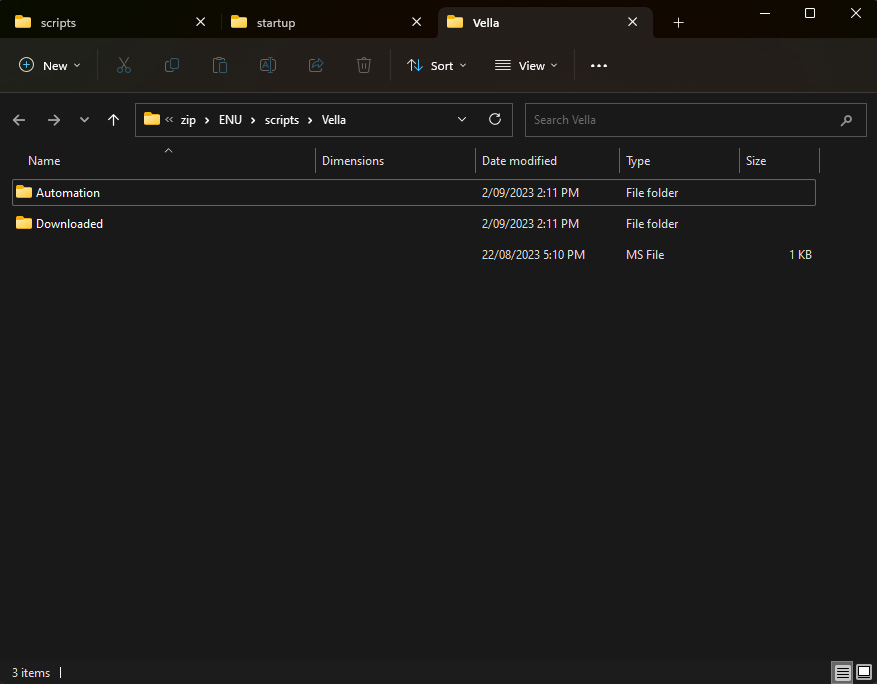
I have one script in my \ENU\scripts\startupfolder – Vella_Rollout.ms. This is the script that we wrote in Part 1 and will call the rest of our scripts. My other scripts are located in a folder I made \ENU\scripts\Vella

As you can see I try to keep things organized so I can add more categories later. Just make sure any of those .ms files do not have a Macroscript at the top which will create an .mcr file every time you run it – it should be similar to the script you run in the editor when doing on the fly changes. If you do comment it out like this:

This way you can always add it back if you want to share it or have it install as an .mcr
Functions and Referencing External Scripts
In Part 1 we created our modifier functions in our startup script. This is because modifier scripts are generally quite short. Some scripts can be much longer and better in their own .ms file. So we can create a function in our startup script that loads in that external script. Here is an example:
-- Camera Clipping
function vellaCameraClipping =
(
	filein ((getDir #userscripts + "\\Vella\\Automation\\JV_CameraClipping.ms"))
)
Rollout
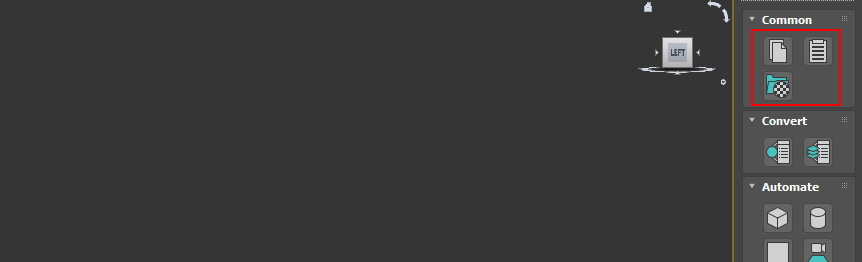
So previously we only had 1 Rollout for our Modifiers. In Part 2 I’m going to demonstrate how we can add more categories to our rollouts. This will give you a visual idea of how we will set up the rollout:

We have 4 categories in my case: Common, Convert, Automate, Modifiers
Modifiers has labels such as: Geometry, Splines, UVW etc.
This is useful since if I make more in the future they can be rolled up/down depending on what I’m focusing on. For example my Automate category is usually things I need when set designing and Modifiers when I’m building assets. Lets add to our rollout those categories:
-- Rollout for Panel "Common"
rollout vellaCommonRollout "Common" category:1
(
	-- We add buttons/icons/tooltip/across:value
	-- We add on button pressed do function
)

-- Rollout for Panel "Automation"
rollout vellaConvertRollout "Convert" category:2
(
	-- We add buttons/icons/tooltip/across:value
	-- We add on button pressed do function
)

-- Rollout for Panel "Automation"
rollout vellaAutomationRollout "Automate" category:3
(
	-- We add buttons/icons/tooltip/across:value
	-- We add on button pressed do function
)

-- Rollout for Panel "Modifiers"
rollout vellaModifierRollout "Modifiers" category:4
(
	-- We add labels
	-- We add buttons/icons/tooltip/across:value
	-- We add on button pressed do function
)
-- Create Rollout Floater
rf = newRolloutFloater "Vella" 120 800
addRollout vellaCommonRollout rf
addRollout vellaConvertRollout rf
addRollout vellaAutomationRollout rf
addRollout vellaModifierRollout rf

-- Dock Rollout
CUI.REGISTERDIALOGBAR rf
CUI.DOCKDIALOGBAR rf #cui_dock_right
As you can see each rollout can be added to our main rollout floater and add them as categories using the category: attribute.
Lets put 3 things in our "Common" category.
-- Rollout for Panel "Common"
rollout vellaCommonRollout "Common" category:1
(

	button btn_copy "Copy" iconName:"CommandPanel\Motion\BipedRollout\MotionFlow\Copy" tooltip:"Copy" across:2
    on btn_copy pressed do vellaCopyObject()

	button btn_paste "Paste" iconName:"CommandPanel\Motion\BipedRollout\MotionFlow\Paste" tooltip:"Paste"
    on btn_paste pressed do vellaPasteObject()


	button btn_gsm "Get Selected Mtls" iconName:"MaterialEditor\GetMaterial" tooltip:"Get Material" across:2
	on btn_gsm pressed do vellaGetSelectedMat()
)
I wont break down all the variables/items as we have already done this in Part 1. However you will notice a new attribute called across:2
This is assigned to the first button, which tells it for the next 2 buttons have them side by side. You can extend this as as wide as you like horizontally and have 5 buttons etc.
Continue to add your functions to each rollout and register any new rollouts/categories below the rollout in the -- Create Rollout Floater section.
Transferring this to another computer or 3dsmax version
So your final script should look something like this
-- MODIFIER FUNCTIONS

-- Chamfer
function yourModChamfer =
(
	-- your modifier code here
)
etc...

-- EXTERNAL SCRIPT FUNCTIONS

-- Camera Clipping
function vellaCameraClipping =
(
	filein ((getDir #userscripts + "\\Vella\\Automation\\JV_CameraClipping.ms"))
)
etc..

-- ROLLOUTS

-- Rollout for Panel "Common"
rollout vellaCommonRollout "Common" category:1
(
	-- We add buttons/icons/tooltip/across:value
	-- We add on button pressed do function
)

-- Rollout for Panel "Automation"
rollout vellaConvertRollout "Convert" category:2
(
	-- We add buttons/icons/tooltip/across:value
	-- We add on button pressed do function
)
etc...
-- Create Rollout Floater
rf = newRolloutFloater "Vella" 120 800
addRollout vellaCommonRollout rf
addRollout vellaConvertRollout rf
etc...

-- Dock Rollout
CUI.REGISTERDIALOGBAR rf
CUI.DOCKDIALOGBAR rf #cui_dock_right
Save this .ms file into your scripts startup directory:
%localappdata%\Autodesk\3dsMax\yourmaxversion\ENU\scripts\startupAll your external scripts should be in a folder in:
%localappdata%\Autodesk\3dsMax\yourmaxversion\ENU\scripts\yourfolderThey can be in subfolders or just all in one folder, that’s up to you:

You can make a zip folder with all your scripts and your startup script and take that with you, when you place them in the same directory as your ENU then they will be available on any new computer or 3dsmax version you switch to. No need to install your scripts/modifiers one by one as your rollout will load automatically on startup and call any script from that folder with your buttons/icons, tooltips and labels. Enjoy!
The final zip contents:


Leave a comment