Introduction
If you want to learn maxscript but having trouble getting started, I kept a journal of my notes as I learned (and still learning) and I think its a good starting point for those who are coming from a different language or just starting their coding journey. I’m sure there are much better ways to do things so these are just tips to get you started – if you know a better way please feel free to comment below and share so others can learn too.
This short guide is aimed at getting you creating your first scripts, learning how to automate your workflow and saving you significant production time as you build on learned concepts. The beauty of maxscript is that its not a complex programming language (in comparison to something like C++), and with a few if-else statements, loops and functions you can do lots of interesting things!
First Steps
Create your first script
First enable the MacroRecorder in the Scripting Listener (I use these settings). You can find the Listener in the bottom left corner, the white/pink box, right click and select Open Listener. This will show you most things you are doing in real-time. You can copy/paste this into the editor and make a script to automate repetitive tasks.

So now in the viewport, Create a box, change some settings, and apply a modifier. You will see something similar to this
SCRIPT:
Box pos:[-3.39752,-7.11465,0] isSelected:on width:26.0599 length:29.7839 height:24.6211
max modify mode
$.lengthsegs = 2
$.widthsegs = 2
$.heightsegs = 2
modPanel.addModToSelection (Chamfer ()) ui:on
You can now delete your box in the viewport. Copy your code from the Listener, right click on the white/pink box and select Open Editor, paste your code. In the Editor press the shortcut Ctrl + E to run your code – you have now created your first macro.
Basic tips
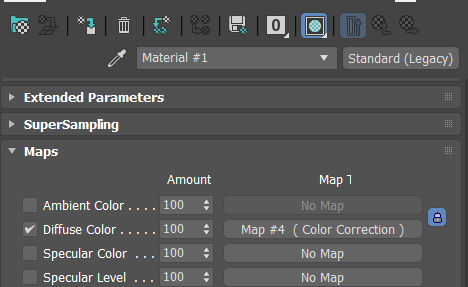
Create an object in your scene, apply a material and select it (I will apply a Standard (Legacy) material). Here are some methods to find settings of this object. $ is your selected object. Type this in the pink section of the Listener and press Enter, this is what will show in the bottom half of the Listener window.
SCRIPT:
showproperties $
OUTPUT:
  .typeinCreationMethod : integer
  .typeInPos : point3
  .typeInLength : float
  .typeInWidth : float
etc..
SCRIPT:
showproperties $.material
OUTPUT:
  .shaderType : integer
  .wire : boolean
  .twoSided : boolean
  .faceMap : boolean
etc..
  .diffuse (Diffuse_Color) : color
SCRIPT:
$.material.diffuse
OUTPUT:
(color 201 201 201)

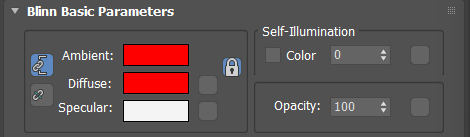
Lets change the diffuse color:
SCRIPT:
$.material.diffuse = (color 255 0 0)

These are the basics, from here you should read the maxscript documentation and go through the starter tutorials. MAXScript for New and Casual Users
Next steps
From here on I wont explain step by step, this will be a reference to those who are familiar with coding or starter tutorials but are just looking for quick ways to access and do things. This assumes you already have an understanding about the basics of coding such as functions, loops, variables, if/then/else, etc. If you already know python then maxscript is quite similar in some ways, however maxscript is less strict about whitespace, indentation, parenthesis etc. If you don’t know any of the basics, you may still be able to follow along so give it a shot.
Comments
Ctrl + Q for Single line comments
Ctrl + Shift + Q for Block comments
EXAMPLE:
-- This is a single line comment

/*
This comments
out any of this text
in a block
/*
Case sensitive
maxscript is not case sensitive, so ShowProperties is the same as showproperties
EXAMPLE:
ShowProperties $
showproperties $
Short variables
When reading other peoples scripts you will see short variables such as:
show is the same as showproperties
mat is the same as material
EXAMPLE:
show $
showproperties $

print $.mat
print $.material

fn myFunction = ()
function myFunction = ()
If then & If do
Maxscript allows you to do if then or if do. I prefer to use if then since if you add an else statement later it won’t create an error.
SCRIPT:
someList = #("one", "two", "three")

for i in someList do
(
    if i == "one" then
    (
        print i
        exit
    )
    else
    (
        print "Not Found"
    )
)
OUTPUT:
"one"
If you used if do then you get this error:
SCRIPT:
someList = #("one", "two", "three")

for i in someList do
(
    if i == "one" do
    (
        print i
        exit
    )
    else
    (
        print "Not Found"
    )
)
OUTPUT:
-- Syntax error: at else, expected <factor>
--  In line:     else
Case of
If you have many if statements it can be simpler to use case of instead of if, if else, etc.
SCRIPT:
a = false
b = false
c = false

case of
(
    (a == true): print "it is a"
    (b == true): print "it is b"
    (c == true): print "it is c"
    default: print "all false"
)
OUTPUT:
"all false"
SCRIPT:
a = false
b = true
c = false

case of
(
    (a == true): print "it is a"
    (b == true): print "it is b"
    (c == true): print "it is c"
    default: print "all false"
)
OUTPUT:
"it is b"
You can also call functions or whatever else you would normally do with if then.
SCRIPT:
a = false
b = true
c = false

fn doSomething =
(
    print "I did something!"
)

case of
(
    (a == true): print "it is a"
    (b == true): doSomething()
    (c == true): print "it is c"
    default: print "all false"
)
OUTPUT:
"I did something!"
Selection
Instead of using $ use selection
When selecting multiple objects or objects in groups its better to use ‘selection’ instead of $
SCRIPT:
for obj in selection do
Otherwise using $ you may get this error.
OUTPUT:
No Info Found on: $selection
However its fine to use $ if you just want to find and test things fast in the listener window when dealing with one object.
First create a box, select it and apply a Standard (Legacy) Material to our selected box. In maxscript listener type.
SCRIPT:
$.material
OUTPUT:
Material #1:Standard__Legacy
Select a scene object by name
This works for mesh, spline, light, camera, etc.
SCRIPT:
for obj in objects do
(
    if obj.name == "Box001" then select obj
)
Scene Materials
Find Properties
Find properties of scene materials.
SCRIPT:
showproperties sceneMaterials
OUTPUT:
showproperties sceneMaterials.Material__1____Standard__Legacy
SCRIPT:
showproperties sceneMaterials.Material__1____Standard__Legacy
OUTPUT:
  .shaderType : integer
  .wire : boolean
  .twoSided : boolean
  .faceMap : boolean
  .faceted : boolean
  .shaderByName : string
  .opacityType : integer
  .opacity : percent
etc..
Change properties (scene wide)
Lets change the last property (opacity) for all Standard Material (or ‘Standard Mtl’) in the scene.
SCRIPT:
for i in sceneMaterials do
(
    if ClassOf i == Standardmaterial then
    (
        i.opacity = 0.0
    )
)
Change properties (selected object)
Now we change the Standard Mtl for selected objects, as long as the main/parent material is not a Multi-Sub Mtl.
SCRIPT:
for obj in selection do
(
    if ClassOf obj.material == Standardmaterial then
    (
	    obj.material.opacity = 0.0
    )
)
Change properties (materials Inside a Mult-Sub Mtl on the selected object)
If any of the objects selected have a Multi-Sub as their main/parent material then we can search through any material associated with our object using this instead.
SCRIPT:
for obj in selection do
(
    for i in getClassInstances Standardmaterial target:obj do
    (
	    i.opacity = 0.0
    )
)
Undo
if you want to create an undo for your functions or entire script you can wrap it in an undo.
SCRIPT:
undo on
(
    -- the script or function goes here
)
Auto Key
We can also specify sections or entire scripts which should not be animated, continuing from above.
SCRIPT:
undo on
(
    with animate off
    (
        -- the script or function goes here
    )
)
Or you can just switch Auto Key off at the top of the script.
SCRIPT:
animButtonState = false
-- the script or function goes here
Strings
Printing Errors
When getting errors with strings make sure you print as string example:
SCRIPT:
myObjects = for obj in objects collect obj
print("Count of My Objects: " + myObjects.count as string)
OUTPUT:
"Count of My Objects: 4"
To avoid the following error:
SCRIPT:
myObjects = for obj in objects collect obj
print("Count of My Objects: " + myObjects.count)
OUTPUT:
-- Error occurred in anonymous codeblock; filename: ; position: 92; line: 2
-- Unable to convert: 4 to type: String
Paths
When using paths its often easier to copy paste from Windows Explorer, but you need to escape every backslash \ for the string to be read correctly. We can fix this using the ‘@’ symbol.
SCRIPT:
myPath = @"C:\MyDirectory\SomeOtherDirectory\MyFile.jpg"
Alternatively you can use forward slashes when not using the @ symbol or unable to due to particular use cases.
SCRIPT:
myPath = "C:/MyDirectory/SomeOtherDirectory/MyFile.jpg"
The other option which is more cumbersome but works is the double back slash.
SCRIPT:
myPath = "C:\\MyDirectory\\SomeOtherDirectory\\MyFile.jpg"
matchPattern & Arrays
You can match string patterns and create new arrays or lists using append.
SCRIPT:
someObjects = #("Box1", "Spline1", "Light1", "Box2")
newObjects = #() -- Initialize an empty array

for i in someObjects do
(
    if matchPattern i pattern:"*Box*" then
    (
        append newObjects i
    )
)

print newObjects
OUTPUT:
"Box1"
"Box2"
You can also use the collect method.
SCRIPT:
someObjects = #("Box1", "Spline1", "Light1", "Box2")
newObjects = for i in someObjects where matchPattern i pattern:"*Box*" collect i

print newObjects
OUTPUT:
"Box1"
"Box2"
Also if you have multiple objects with the same name/attribute you can use append if unique instead.
SCRIPT:
someObjects = #("Box1", "Spline1", "Light1", "Box2", "Box1", "Box2")
newObjects = #() -- Initialize an empty array
for i in someObjects do
(
    if matchPattern i pattern:"*Box*" then
    (
        appendIfUnique newObjects i
    )
)

print newObjects
OUTPUT:
"Box1"
"Box2"
You can read more about matchPattern.
Useful ways to access parts of the C Drive
Current 3dsmax Directory.
SCRIPT:
maxDir = "\"" + (getDir #maxRoot) + "3dsmax.exe" + "\""
OUTPUT:
"C:\Program Files\Autodesk\3ds Max 2021\3dsmax.exe"
Current 3dsmax File version (Note the version is the 8th item in the list).
SCRIPT:
currentMaxVersion = maxVersion()
OUTPUT:
#(23000, 57, 0, 23, 3, 17, 98, 2021, ".3.17 Security Fix")
EXAMPLE:
year = currentMaxVersion[8] as string
OUTPUT:
"2021"
File Path & Name.
SCRIPT:
local jobFile = maxFilePath + maxFileName
OUTPUT:
"C:\Users\James\Desktop\test.max"
User scripts (Useful place to put scripts since they are always accessible by the user without advanced permissions).
SCRIPT:
(getDir #userscripts)
OUTPUT:
"C:\Users\James\AppData\Local\Autodesk\3dsMax\2021 - 64bit\ENU\scripts"
User name.
SCRIPT:
sysInfo.username
OUTPUT:
"James"
EXAMPLE:
print (@"C:\Users\" + sysInfo.username + @"\Documents\")
OUTPUT:
"C:\Users\James\Documents\"
Some more useful system directories and system information.
Catching Errors
You can use getCurrentException() to catch an error for debugging or flagging issues so you know where and how to fix them later.
SCRIPT:
try
(
    a = 1
    print (a + "string")
)
catch
(
    print (getCurrentException())
)
OUTPUT:
"-- Incompatible types: 1, and "string""
Classof
Use classof when looking for a class object that you can swap with a different class. In this example we swap our Diffuse: Color Correction with a Checker map.
SCRIPT:
if classof $.material.diffuseMap == Color_Correction then
(
    $.material.diffuseMap = Checker()
)
EXAMPLE:

There are many uses for classof but this is just one example. Other useful ways to access classes:
showClass "box*" -- all 3ds max classes starting "box"
showClass "box.*" -- all the accessible properties of the box class
showClass "*:mod*" -- all the modifier classes
showClass "*.*rad*" -- all the classes with a property name containing "rad"
isKindOf
Similar to classof, we can filter things by using isKindOf.
SCRIPT:
for i in sceneMaterials where (isKindOf i Standardmaterial) do
(
    print i
)
OUTPUT:
Material #1:Standard__Legacy
Other useful ways to use isKindOf.
getClassInstances
Filter class
This is a useful way to search, collect or modify things by class type. For example we can search through the scene and print only materials that are Standard Mtls. This can be especially handy when dealing with more complex things like Multi-Sub materials. For example we can replace or print materials by class type without worrying if its in a Multi-Sub or not:
SCRIPT:
for i in getClassInstances Standardmaterial do
(
    print i
)
OUTPUT:
Material #1:Standard__Legacy
If your material was in a multi-sub and you tried to use classof then you would not find it since its nested in the Multi-Sub, here is an example.
SCRIPT:
for i in sceneMaterials do
(
    if classof i == Standardmaterial then
    (
        print i
    )
)
OUTPUT:
OK
-- Which means nothing happened in this case, your script just finished without errors
Filter multiple classes
Another useful way is to combine classes when searching. For example in Vray you can use VrayBitmaps as well as Standard bitmaps. You can combine your search and then replace or adjust things as needed.
SCRIPT:
for obj in selection do
(
    for i in (getClassInstances VRayBitmap target:obj) + (getClassInstances Bitmaptexture target:obj) do
    (
        print i
    )
)
OUTPUT:
Map #2:Bitmap
Map #1:VRayBitmap
Or you can use a data pair.
SCRIPT:
for pair in getClassInstances #(VRayBitmap, Bitmaptexture) do
(
    local instances = pair.value
    for i in instances do
    (
        print i
    )
)
OUTPUT:
Map #1:VRayBitmap
Map #2:Bitmap
replaceInstances & Multi-Sub materials
Following our last example from getClassInstances, lets replace our Standard Mtl with a Physical Mtl. This works for any material that matches the class, regardless if its in a Multi-Sub or not:
SCRIPT:
p = PhysicalMaterial()
for i in getClassInstances Standardmaterial do
(
    replaceInstances i p
)
EXAMPLE:

Take note, this just replaces the material with new one, if you want to transfer all the textures and settings you will need to store all the values and then place them into the new material.
WARNING:
replaceInstances does what it says, it replaces things. So if you want to keep a copy of the original material make sure you store it in a variable. This is useful when you want to convert your materials to another format (for example from Physical to GLTF), export the object, then put the material back on the object.
EXAMPLE:
-- Keep a copy of the original Physical Mtl
oldMaterial = obj.material

-- Create GLTF material
p = glTFMaterial ()

-- Some code similar to above, replaces the material from something to something else (Physical to GLTF for example)

-- Replace Physical with GLTF Mtl
replaceInstances i p

-- Some code to export the object as GLTF

-- Put the Physical Mtl back on the object after export
obj.material = oldMaterial
Bitmaps
Working with stripped paths
We can use filenameFromPath when dealing with bitmaps so that we don’t need to change the full path or directory where that texture is. This is useful for when you want to swap or copy textures.
SCRIPT:
-- Copy diffuse texture
currentBitamp = filenameFromPath $.material.diffuseMap.filename

-- Paste diffuse into bump slot
$.material.bumpMap = Bitmaptexture filename:(currentBitamp)

-- Set name
$.material.bumpMap.name = "bump_tex"
EXAMPLE:

For Loops (exit instead of break)
This is why you use exit instead of break
SCRIPT:
-- #() is a list
someList = #("one", "two", "three")

for i in someList do
(
    print i
    exit
)
OUTPUT:
"one"
When using break
SCRIPT:
-- #() is a list
someList = #("one", "two", "three")

for i in someList do
(
    print i
    break
)
OUTPUT:
"one"
"two"
"three"
WARNING:
Its not good practice to use exit as it is slow as described in the manual (it internally uses a try/catch).
SCRIPT:
try
(
    -- Your code
)
catch
(
    print "Something in try() failed, exit code and continue without crashing the script"
)
However I find it works well for smaller functions, testing or functions that are not time consuming, a more recommended way would be to use a loop condition or similar.
SCRIPT:
 while true do
 (
     -- Your code
 )
Break is used for debugging by adding break points in the code using do break(), you can read more about this here.
Continue
You can use continue to skip over things. Example with continue.
SCRIPT:
myArray = #(1, 2, undefined, 4)

for i in myArray do
(
    if i == undefined then
    (
        continue
    )
    else
    (
        print i
    )
)
OUTPUT:
1
2
4
Example without continue.
SCRIPT:
myArray = #(1, 2, undefined, 4)

for i in myArray do
(
    print i
)
OUTPUT:
1
2
undefined
4
Help/Searching for things
You search the scene for things, for example we can find different chamfer methods, modifiers etc.
SCRIPT:
help "chamfer"
OUTPUT:
NURBSChamferCurve (const Class): NURBSChamferCurve
Fillet_Chamfer (const MAXClass): Fillet_Chamfer
polyop.chamferEdges (Primitive): chamferEdges()
polyop.chamferVerts (Primitive): chamferVerts()
...etc...
Chamfer (const MAXClass): Chamfer
Modifiers
Find settings for each modifier
For example we can look at the properties of the Chamfer modifier.
SCRIPT:
show (Chamfer ())
OUTPUT:
Chamfer:Chamfer
  .amount : worldUnits
  .segments : integer
  .tension : float
  .openchamfer : boolean
etc..
Or you can apply a modifier to your object and inspect its properties in the maxscript listener.
SCRIPT:
show $.chamfer
Create your own Modifier Templates
Example 1: Lathe modifier (for splines)
The first time you use the macro recorder and decide to make a macro/toolbar shortcut of your favorite settings for each modifier, you might find instances where it breaks – such as on groups or objects that cannot use that modifier. This can be frustrating but there is an easy fix.
SCRIPT:
-- Switch to modifiers tab
max modify mode

theMod = Lathe()
    theMod.weldCore = on
    theMod.mapcoords = on
    theMod.flipNormals = on

    -- Instance modifier on sub-object level or muiltiple objects
    if modPanel.validModifier theMod then modPanel.addModToSelection theMod
BREAKDOWN:
max modify mode
Switches to modifier panel before applying. This is necessary for single objects because if you are in the create panel it wont apply the modifier until you switch to the modifier panel.
if modPanel.validModifier theMod
This checks if the modifier is valid – meaning if its a geometry instead of a spline (or opposite) it wont apply the modifier or break/stop the code mid progress.
“theMod” – this is an easy way of defining which modifier, once the variable is set we can call this instead of “modPanel.validModifier Lathe”
then modPanel.addModToSelection theMod
Apply the modifier to all the objects selected. This way it also applies to groups or multiple selections without needing to explicitly state what class each object is.
Example 2: Chamfer modifier (for mesh)
SCRIPT:
-- Switch to modifiers tab
max modify mode

-- Modifier
theMod = Chamfer()
-- Modifier Settings
theMod.SmoothType = 1
theMod.miteringType = 0
theMod.amount = 0.25
theMod.useminangle = off
theMod.tension = 0.5
theMod.smoothtoadjacent = on
theMod.segments = 2

-- Instance modifier on sub-object level or muiltiple objects
if modPanel.validModifier theMod then modPanel.addModToSelection theMod
SubAnims
Lets use an example of a spline with a sweep modifier. We can get the settings of the subanims of our object and find what we need.
SCRIPT:
getSubAnimNames $
OUTPUT:
$Editable_Mesh:Rectangle004 @ [84.792351,-0.000000,7.506661]
#(#visibility, #Space_Warps, #transform, #Modified_Object, #material, #Image_Motion_Blur_Multiplier, #Object_Motion_Blur_On_Off)
The forth in the array is #Modified_Object. Notice: that maxscript is 1 based not 0 based so #Modified_Object is 4.
SCRIPT:
getSubAnimNames b[4]
OUTPUT:
#(#sweep, #Rectangle__Object)
Access our sweep.
SCRIPT:
getSubAnimNames b[4][1]
OUTPUT:
#(#x_offset, #Y_Offset, #angle, #Bar_Section)
Access our Bar_Section to adjust length/width.
SCRIPT:
getSubAnimNames b[4][1][4]
OUTPUT:
#(#render_thickness, #render_sides, #render_angle, #render_width, #render_length, #render_angle2, #render_threshold, #cap_segments, #sphere_cap, #length, #width, #Corner_Radius)
Change our length & width.
SCRIPT:
    for obj in selection do
    (
        obj[4][1][4].length = 1.5
        obj[4][1][4].width = 3.5
    )
Enums
showInterfaces can be useful to find enum settings.
SCRIPT:
viewSetting = NitrousGraphicsManager.GetActiveViewportSetting()
showInterfaces viewSetting
OUTPUT:
 Interface: ViewportViewSettingImpl
   Properties:
    .ShowEdgedFacesEnabled : boolean : Read|Write
    .UseTextureEnabled : boolean : Read|Write
    .TransparencyEnabled : boolean : Read|Write
    .SelectedEdgedFacesEnabled : boolean : Read|Write
    .ShowSelectionBracketsEnabled : boolean : Read|Write
    .ShadeSelectedFacesEnabled : boolean : Read|Write
    .DisableViewport : boolean : Read|Write
    .ViewportClippingEnabled : boolean : Read|Write
    .UseEnvironmentBackgroundColorEnabled : boolean : Read|Write
    .UseViewportBackgroundEnabled : boolean : Read|Write
    .VisualStyleMode : enum : Read|Write
       VisualStyleMode enums: {#Realistic|#Shaded|#Facets|#ConsistentColors|#HiddenLine|#Wireframe|#BoundingBox|#Clay|#ModelAssist|#Ink|#ColorInk|#Acrylic|#Tech|#Graphite|#ColorPencil|#Pastel}
etc...
.ViewportPreset : enum : Read|Write
       ViewportPreset enums: {#Quality|#Standard|#Performance|#DXMode|#Customize}
etc...
This way you can control the viewport shading.
SCRIPT:
viewSetting.VisualStyleMode = #Shaded
viewSetting.ViewportPreset = #Standard
Material Classes
You can find all types of material classes available to use in 3dsmax.
SCRIPT:
Material.classes
OUTPUT:
#(NoMaterial, Standardmaterial, TopBottom, Multimaterial, Multimaterial_empty, DoubleSided, Blend, Shell_Material, MatteShadow, VRaySimbiontMtl, InkNPaint, VRayFlakesMtl, DirectX_9_Shader, VRayOSLMtl, Architectural, VRayOverrideMtl, VRayHairMtl, VRayVRmatMtl, VRayFlakesMtl2, Autodesk_Material, ...)
Show more items in the listener output
Referring to our last example checking for material classes you will notice at the end you will have this.
EXAMPLE:
Autodesk_Material, ...)
This indicates there is more to show, but maxscript by default limits the result to 20 items. You can change this by allowing it to print all elements.
SCRIPT:
Options.printallelements = true
Now lets run the “Material.classes” again and this will be the output.
OUTPUT:
#(NoMaterial, Standardmaterial, TopBottom, Multimaterial, Multimaterial_empty, DoubleSided, Blend, Shell_Material, MatteShadow, VRaySimbiontMtl, InkNPaint, VRayFlakesMtl, DirectX_9_Shader, VRayOSLMtl, Architectural, VRayOverrideMtl, VRayHairMtl, VRayVRmatMtl, VRayFlakesMtl2, Autodesk_Material, RaytraceMaterial, XRef_Material, Advanced_Lighting_Override, Material_Output_Select, etc..
Persistence
Scripts are not persistent between scenes. This means that once you restart 3dsmax you cannot call a global variable or something defined previously. There are 2 easy ways to handle this.
Store the data in a text file
Save text file
You can create a text file, store it somewhere (I like to keep things in the ENU #userScripts Directory), and then refer back to it later. This is useful to save custom settings the user has input from your UI.
SCRIPT:
-- Directory for our scripts
saveDirectory = getDir #userScripts + "\\MyScripts"

-- Create directory if it does not exist
if not doesFileExist saveDirectory do makeDir saveDirectory

-- Save settings to text file
savedSettings = (saveDirectory + "\\MySavedSettings.txt")
saveStream = createFile savedSettings

-- Save numerical properties
format "%\n" "75" to:saveStream
format "%\n" "50" to:saveStream
format "%\n" "25" to:saveStream

-- Close the text file
close saveStream
free saveStream
ForceCompleteRedraw()
OUTPUT (In your text file):
75
50
25
Load text file
Now we can use that data at a later point, as an example we will change our values of our Standard Mtl on our selected object (opacity, specular level and glossiness).
SCRIPT:
saveDirectory = getDir #userScripts + "\\MyScripts"
savedSettings = (saveDirectory + "\\MySavedSettings.txt")

-- Create text file if it does not exist
if doesFileExist savedSettings then
(
    openStream = openfile savedSettings
    -- Read each line from the text file
    while not eof openStream do
    (
        -- Check our material is standard
        for obj in selection where classof obj.material == Standardmaterial do
        (
            obj.material.opacity = readValue openStream
            obj.material.specularLevel = readValue openStream
            obj.material.glossiness = readValue openStream
        )
    )
    -- Close the text file
    close openStream
    free openStream
    ForceCompleteRedraw()
)
EXAMPLE:


Assign prop values to objects
Set userprop value
You can also set userprop values for objects in the scene.
SCRIPT:
-- Create a box
b = box()

-- Assign userprops
setUserProp b "MyCat" "Fuzzy"
setUserProp b "Number" 13
EXAMPLE:
Right click on your object, select object properties, then the User Defined tab.

We can retrieve the data using getuserprop.
SCRIPT:
catsName = getUserProp b "MyCat"
print (catsName as string)
OUTPUT:
"Fuzzy"
Set userprop using a dictionary
You can also setuserprop using a dictionary.
SCRIPT:
myProps = Dictionary #("MyCat", "Fuzzy") #("Number", 13) etc...
setUserPropsFromDict b myProps
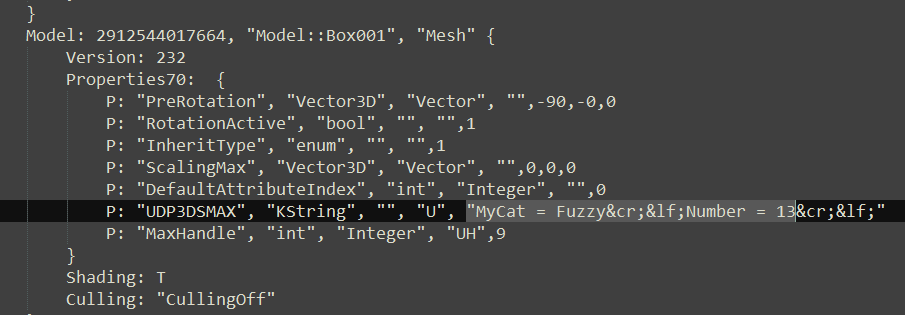
You can now use this data when merging this object into another scene, or the same scene or even when you export your file as FBX.
userprops in FBX Files
For example when exporting as an FBX ASCII file we can open the FBX file as a text file in notepad and search for our properties. This can be useful for parsing additional data in another software to manipulate our object based on our own properties.
EXAMPLE:
getuserprop
This can be quite a powerful way of collecting information about many different things.
Userprop’s also have other uses such as within 3dsmax itself for storing your own data for other scripting tasks, more information on userprop.
Combine Scripts
fileIn
Its often easier to read your scripts if they are separate and smaller/specific. This way you can organize things easier for reference and at a later point or build a UI that can access many scripts in one. For example I keep all my scripts in the ENU directory for 3dsmax (or you can create a subdirectory here such as “MyScripts”).
SCRIPT:
-- C:\Users\YOURUSERNAME\AppData\Local\Autodesk\3dsMax\2024 - 64bit\ENU\scripts\MyScripts

myScripts = (getDir #userscripts + "\\MyScripts\\")

filein (myScripts + "MyFirstScript.ms")
This will run that script. If you want to execute that script at a later point you can turn this into a function instead, for example:
SCRIPT:
function RunMyFirstScript =
(
    filein (myScripts + "MyFirstScript.ms")
)
Now when you want to run that script, you can call it like this
SCRIPT:
RunMyFirstScript()
fileIn multiple scripts
Another way is to file in all the scripts in your directory if you want to have all your functions available in your current script (or load them on startup).
SCRIPT:
-- Specify the directory path
myScripts = (getDir #userscripts + "\\MyScripts\\")

-- Get a list of all script files in the directory
scriptFiles = getFiles (directoryPath + "*.ms")

-- Loop through the list and execute each script file
for script in scriptFiles do
(
    fileIn script
)
Include
“fileIn” runs the script. “Include” basically injects the other script at that point of the code. Typically I find fileIn more stable, you will come across times where include just wont work in a UI Rollout or similar and fileIn is just more predictable.
Execute
Its also mentioned in the documentation that execute is not often required. However I do like to use it in macro scripts.
SCRIPT:
macroScript ExecuteTest
    category:"My Scripts"
    ButtonText:"Execute Me"
(
    on execute do
    (
        filein (getDir #userscripts + "\\MyScripts\\MyFirstScript.ms")
    )
)
Run saved macro
Alternatively you can also reference your macro if its already installed and “run” it (more on that below).
SCRIPT:
macros.run "My Scripts" "ExecuteTest"
Multiple functions
Maxscript allows you to create functions of the same name and will just overwrite the previous one so be aware of this (especially when combining scripts together).
SCRIPT:
fn MyFunction =
(
    print "Function 1"
)

fn MyFunction =
(
    print "Function 2"
)

MyFunction()
OUTPUT:
"Function 2"
Macro scripts (.mcr)
Single macro
You can register your scripts as a usermacro so that you can create toolbar buttons or place your scripts in menus, quads etc. So instead of saving your file as a .ms you can also save a .mcr file (or both). Lets use our lathe modifier script from earlier as an example.
SCRIPT:
macroScript Modifier_Lathe
    category:"My Scripts"
    tooltip:"Modifier Lathe"
    buttonText:"Lathe"
    Icon:#("Extended",10)
(
    max modify mode

    theMod = Lathe()
    theMod.weldCore = on
    theMod.mapcoords = on
    theMod.flipNormals = on

    if modPanel.validModifier theMod then modPanel.addModToSelection theMod
)
EXAMPLE:

BREAKDOWN:
category – Keep this always the same to keep all your scripts in the same category (red rectangle in the screenshot above)
tooltip – When you hover the mouse over the button this tooltip will appear
buttonText – If not using icons this will be the button text
Icon:#(“Extended”,10) – Select an icon from the built-in list
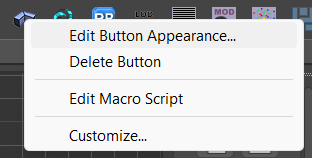
To find an icon from the built-in list you can right click on an icon and select “Edit Button Appearance…”
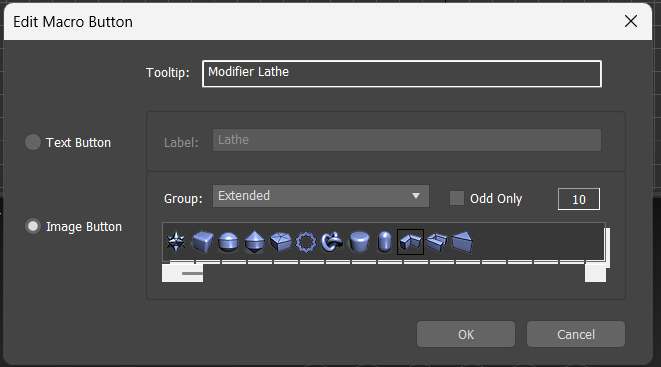
Select “Image Button” on the left, You can then scroll through the “Groups”. The Groups will be the first item in the Icon array for example “Extended”. The second item in the array is which icon from that Group you have selected which in this case is 10.
The macro you created will be saved in this location:
C:\Users\YOURUSERNAME\AppData\Local\Autodesk\3dsMax\2024 - 64bit\ENU\usermacros
You can also find them in here.
SCRIPT:
macroDirectory = (GetDir #userMacros)
print macroDirectory
OUTPUT:
"C:\Users\YOURUSERNAME\AppData\Local\Autodesk\3dsMax\2024 - 64bit\ENU\usermacros"
Multiple macro’s
You can also put more than one macro into your file and execute other scripts from each macro you make. This is useful if you want just one macro that installs multiple tools at once and references your script (.ms) files. For example.
EXAMPLE:
Directory: C:\Users\YOURUSERNAME\AppData\Local\Autodesk\3dsMax\2024 - 64bit\ENU\scripts\MyScripts

SCRIPT:
myScripts = getDir #userScripts + "\\MyScripts\\"

macroScript Modifier_Lathe
    category:"My Scripts"
    tooltip:"Modifier Lathe"
    buttonText:"Lathe"
    Icon:#("Extended",10)
(
    filein (myScripts + "lathe.ms")
)

macroScript Modifier_Chamfer
    category:"My Scripts"
    tooltip:"Modifier Chamfer"
    buttonText:"Chamfer"
    Icon:#("Extended",11)
(
    filein (myScripts + "chamfer.ms")
)
EXAMPLE:
Once you run the script it will install your macros into the usermacro directory.
EXAMPLE:
Directory: C:\Users\YOURUSERNAME\AppData\Local\Autodesk\3dsMax\2024 - 64bit\ENU\usermacros

It will also now appear in your 3dsmax toolbars/quads etc.

You can also use many other newer icons instead of these, this will be covered below in the Rollout Floater Icons section below. You will simply replace Icon:# with iconName:”…”
Rollouts and UI
Creating a rollout for your script is a must when giving your scripts to clients and customers. Its easier for them to select the options they need with buttons, adjust settings and things that suit their needs. Its also useful to access your own scripts that you build in one handy place. Lets use our Modifiers as an example for our UI.
Simple Dialog Rollout
SCRIPT:
-- Script directory where our .ms files are
myScripts = getDir #userScripts + "\\MyScripts\\"

function latheModifier =
(
    filein (myScripts + "lathe.ms")
)

function chamferModifier =
(
    filein (myScripts + "chamfer.ms")
)

-- Close rollout if open
try(DestroyDialog MyToolbar_Rollout)catch()

-- Rollout UI
rollout MyToolbar_Rollout "My Toolbar"
(
    button btn1 "Chamfer" height:20 tooltip:"Chamfer"
    on btn1 pressed do chamferModifier()

    button btn2 "Lathe" height:20 tooltip:"Lathe"
    on btn2 pressed do latheModifier()
)

-- Create rollout UI
CreateDialog MyToolbar_Rollout POS:[100,200] width:150 height:85
EXAMPLE:

Rollout Floater
I prefer using a Rollout Floater since we can create categories that can be rolled up/down to separate our tools, also the UI looks a bit nicer/newer and is easily docked. We need to add a register and unregister for the rollout floater. We use a try/catch for closing the dialog if its open so it doesnt throw an error if its not.
SCRIPT:
myScripts = getDir #userScripts + "\\MyScripts\\"
function latheModifier =
(
filein (myScripts + "lathe.ms")
)
function chamferModifier =
(
filein (myScripts + "chamfer.ms")
)
-- Close rollout if open
try(cui.UnRegisterDialogBar myRolloutFloater)catch()
try(closeRolloutFloater myRolloutFloater)catch()
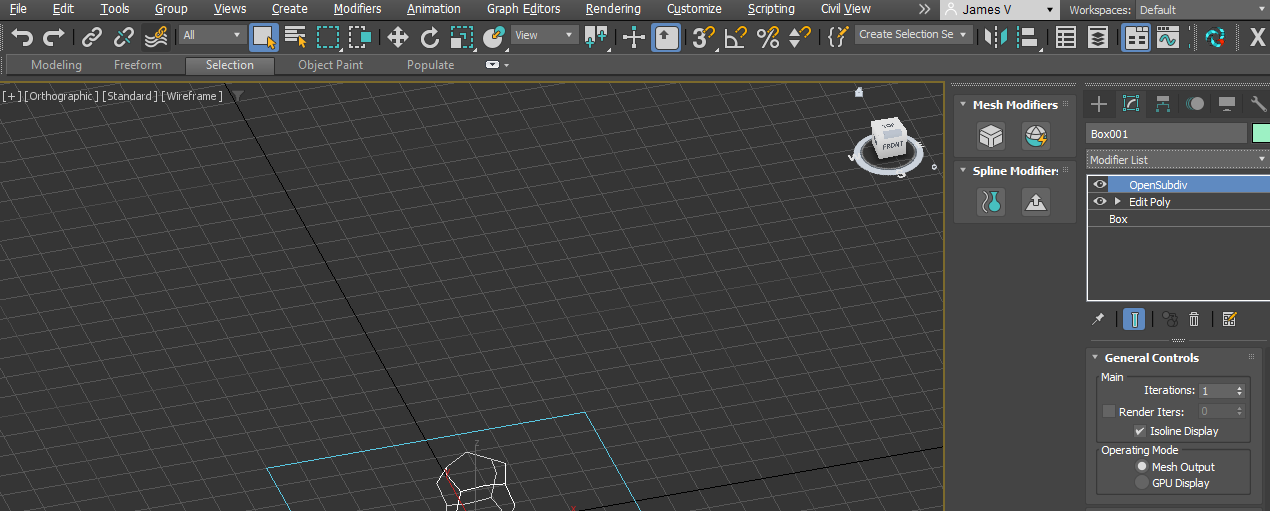
-- Rollout for Panel "Mesh Modifiers"
rollout meshModifiers "Mesh Modifiers" category:1
(
button btn1 "Chamfer" height:20 tooltip:"Chamfer"
on btn1 pressed do chamferModifier()
)
-- Rollout for Panel "Spline Modifiers"
rollout splineModifiers "Spline Modifiers" category:2
(
button btn2 "Lathe" height:20 tooltip:"Lathe"
on btn2 pressed do latheModifier()
)
-- Create Rollout Floater
myRolloutFloater = newRolloutFloater "My Toolbar" 300 300
-- Add rollout categories
addRollout meshModifiers myRolloutFloater
addRollout splineModifiers myRolloutFloater
-- Register Rollout
cui.registerDialogBar myRolloutFloater
EXAMPLE:

Rollout Floater Icons
We can also assign the new 3dsmax icons to them, there’s many built-in and I prefer them over making my own since its fairly straight forward. Lets add 2 buttons to each category to demonstrate. Here is a reference for the huge built-in library of icons (note to self). Just be aware some icons just dont work, so you may have to use others.
The rest of the code above is as it was, I have just updated the rollout categories.
SCRIPT:
rollout meshModifiers "Mesh Modifiers" category:1
(
    button btn1 "Chamfer" iconName:"MainUI\ChamferBox" tooltip:"Chamfer"
    on btn1 pressed do chamferModifier()

    button btn3 "OpenSubdiv" iconName:"MainUI\TurboSmooth" tooltip:"OpenSubdiv"
)

-- Rollout for Panel "Spline Modifiers"
rollout splineModifiers "Spline Modifiers" category:2
(
    button btn2 "Lathe" iconName:"MainUI\Lathe" tooltip:"Lathe"
    on btn2 pressed do latheModifier()

    button btn4 "Layers" iconName:"EditUVW\AlignToPlanarMap" tooltip:"Extrude"
)
EXAMPLE:

Lets use the last icon as an example to find the iconName
EXAMPLE:

By default it puts the icons under each other, you can set how many icons you want horizontally by adjusting the code as below ( across: ). Lets also reduce the width of the rollout to fit our icons nicely. We can also dock it to the right side (or any side).
SCRIPT:
-- Rollout for Panel "Mesh Modifiers"
rollout meshModifiers "Mesh Modifiers" category:1
(
    button btn1 "Chamfer" iconName:"MainUI\ChamferBox" tooltip:"Chamfer" across:2
    on btn1 pressed do chamferModifier()

    button btn3 "OpenSubdiv" iconName:"MainUI\TurboSmooth" tooltip:"OpenSubdiv"
)

-- Rollout for Panel "Spline Modifiers"
rollout splineModifiers "Spline Modifiers" category:2
(
    button btn2 "Lathe" iconName:"MainUI\Lathe" tooltip:"Lathe" across:2
    on btn2 pressed do latheModifier()

    button btn4 "Layers" iconName:"EditUVW\AlignToPlanarMap" tooltip:"Extrude"
)

-- Create Rollout Floater
myRolloutFloater = newRolloutFloater "My Toolbar" 130 300

-- Add rollout categories
addRollout meshModifiers myRolloutFloater
addRollout splineModifiers myRolloutFloater

-- Register Rollout
cui.registerDialogBar myRolloutFloater

-- Dock Rollout
CUI.DOCKDIALOGBAR myRolloutFloater #cui_dock_right
EXAMPLE:
Here is an example of when you flesh this out with all your custom scripts.
EXAMPLE:

If you are curious about the labels inside my Modifier categories you can add them like this:
SCRIPT:
-- Rollout for Panel "Mesh Modifiers"
rollout meshModifiers "Mesh Modifiers" category:1
(
    label label_favs "My Favourites"

    button btn1 "Chamfer" iconName:"MainUI\ChamferBox" tooltip:"Chamfer" across:2
    on btn1 pressed do chamferModifier()
    etc....
EXAMPLE:

Exposing settings
We can also expose the settings of the modifier in our rollout and change them using spinners, buttons, radio buttons etc. Lets use the chamfer modifier as an example. We can apply this modifier to selected objects and also give the user an option to update the settings if they want to.
SCRIPT:
-- Close rollout if open
try(cui.UnRegisterDialogBar myRolloutFloater)catch()
try(closeRolloutFloater myRolloutFloater)catch()

-- Rollout for Panel "Mesh Modifiers"
rollout meshModifiers "Mesh Modifiers" category:1
(
    label label_modc "Chamfer"

    spinner spn_cAmount "Amount: " range:[0,999999,1] type:#float
    spinner spn_cSegments "Segments: " range:[0,10,1] type:#integer

    button btn1 "Create Chamfer" tooltip:"Chamfer"
    on btn1 pressed do
    (
        -- myChamfer()
        theMod = Chamfer()
        theMod.amount = spn_cAmount.value
        theMod.segments = spn_cSegments.value
        if modPanel.validModifier theMod then modPanel.addModToSelection theMod
    )

    button btn2 "Update Chamfer" tooltip:"Update Current Modifier"
    on btn2 pressed do
    (
        for obj in selection do
        (
            for theMod in obj.modifiers do
            (
                if isKindOf theMod Chamfer do
                (
                    theMod.amount = spn_cAmount.value
                    theMod.segments = spn_cSegments.value
                )
            )
        )
    )
)

-- Create Rollout Floater
myRolloutFloater = newRolloutFloater "My Toolbar" 130 300

-- Add rollout categories
addRollout meshModifiers myRolloutFloater

-- Register Rollout
cui.registerDialogBar myRolloutFloater
EXAMPLE:

BREAKDOWN:
First we have a label “Chamfer”:
label label_modc "Chamfer"
Then we create our spinners for our 2 settings we want to expose:
spinner spn_cAmount "Amount: " range:[0,999999,1] type:#float
spinner spn_cSegments "Segments: " range:[0,10,1] type:#integer
The range is the lowest value, then largest, then starting value. We then specify that type can be a float or integer since segments are an integer and amount would be better as float.
We then put our code we want to perform into the buttons, either create or update. You can find more rollout examples here.
Real-time modifier updates
We could also make this more interactive using on spinner changed instead of an “Update” button.
SCRIPT:
-- Close rollout if open
try(cui.UnRegisterDialogBar myRolloutFloater)catch()
try(closeRolloutFloater myRolloutFloater)catch()

-- Rollout for Panel "Mesh Modifiers"
rollout meshModifiers "Mesh Modifiers" category:1
(
    label label_modc "Chamfer"

    spinner spn_cAmount "Amount: " range:[0,999999,1] type:#float
    spinner spn_cSegments "Segments: " range:[0,10,1] type:#integer

    -- newValue parameter to accept the new value of the spinner
    on spn_cAmount changed newValue do
    (
        -- print ("New Value: " + newValue as string)
        for obj in selection do
        (
            for theMod in obj.modifiers do
            (
                if isKindOf theMod Chamfer do
                (
                    theMod.amount = spn_cAmount.value
                )
            )
        )
    )

    on spn_cSegments changed newValue do
    (
        for obj in selection do
        (
            for theMod in obj.modifiers do
            (
                if isKindOf theMod Chamfer do
                (
                    theMod.segments = spn_cSegments.value
                )
            )
        )
    )

    button btn1 "Create Chamfer" tooltip:"Chamfer"
    on btn1 pressed do
    (
        max modify mode
        theMod = Chamfer()
        theMod.amount = spn_cAmount.value
        theMod.segments = spn_cSegments.value
        if modPanel.validModifier theMod then modPanel.addModToSelection theMod
    )
)

-- Create Rollout Floater
myRolloutFloater = newRolloutFloater "My Toolbar" 130 300

-- Add rollout categories
addRollout meshModifiers myRolloutFloater

-- Register Rollout
cui.registerDialogBar myRolloutFloater
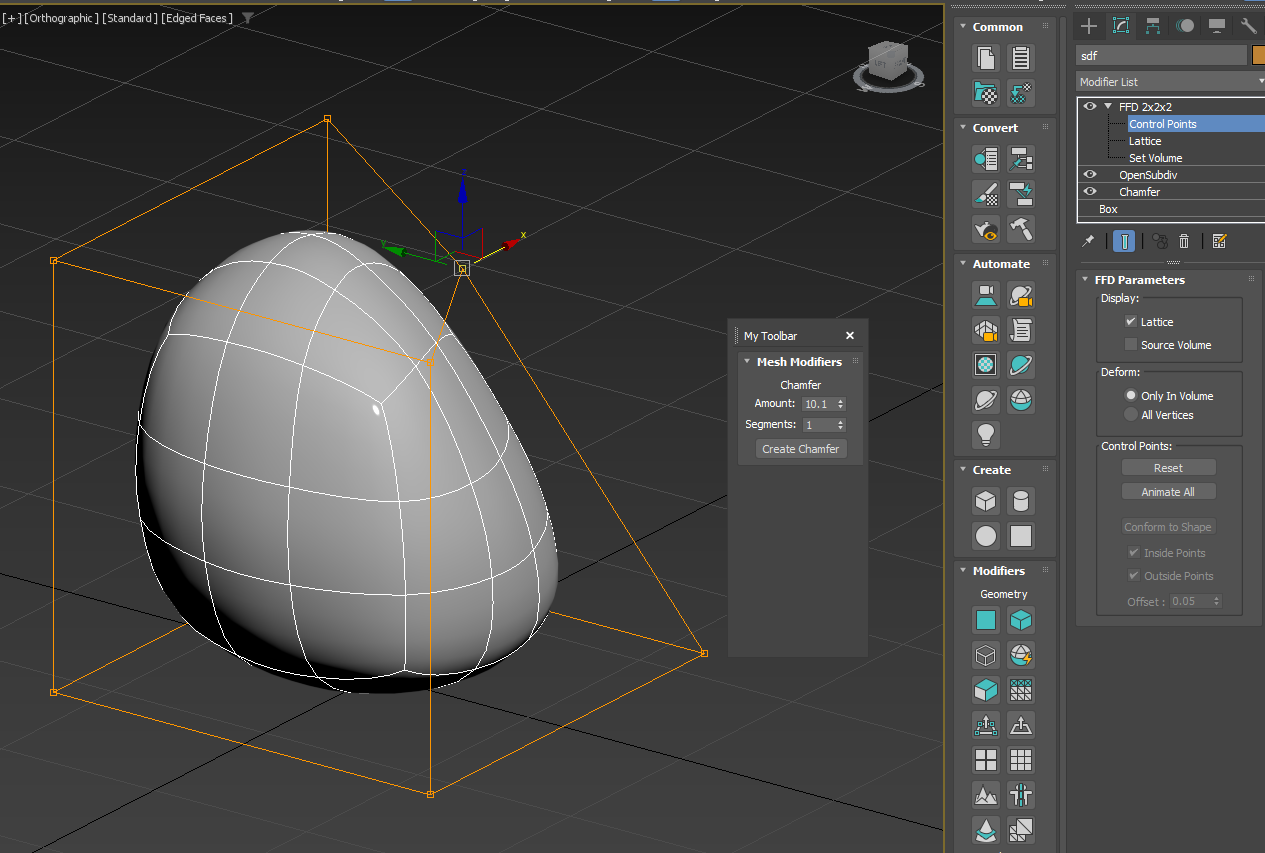
A cool side effect of this is that you can control your modifiers when other modifiers are stacked on top giving you real-time feedback. Example is adjusting an FFD modifier with an Opensubdiv above our Chamfer and we can interactively update both the chamfer and the FFD at the same time.
EXAMPLE:

Using other downloaded scripts in your UI
If you would like to filein .ms scripts you have downloaded and use them in your UI, open them first in notepad and check if they have a macroScript at the top. If they do you can comment it out like below and then it will run on demand (when you filein) or execute that script.
SCRIPT:
/*
macroScript SomeDownloadedScript
    category:"My Scripts"
    tooltip:"Modifier Lathe"
    buttonText:"Lathe"
    Icon:#("Extended",10)
*/
Take your UI with you
Once you create your UI .ms file you can put this in your ENU/scripts/startup directory so it launches every time you open 3dsmax (My_Rollout.ms). I like to keep my UI script separate from all my working scripts so instead of putting the code for each script in it (which would make it very long) I filein the scripts for each button in the UI from a directory that I have in the ENU/Scripts/MyScripts directory. The reason being is that I can update each of those scripts separately and they are not loaded into memory – so that means every time I click the button again in my UI it reloads that script (runs it once) and if I need to update it again I don’t need to reload my UI. So in the end you have something like this.
EXAMPLE:

Another benefit is all you need to do when using a new computer or 3dsmax install is copy your startup script and your MyScripts folder, paste it into the ENU of the new machine, start 3dsmax and all your scripts are ready to use.
Working with Different Units
One thing to be aware of is when making scripts for others make sure you take into consideration they might use different scene units to you. So setting floats and values using 1.0 could be 1 meter in your scene and 1 centimeter in theirs. Lets create a box that works in both system units.
SCRIPT:
-- Decode Units
oneMeter = units.decodeValue "1m"

-- Create box using specific units
mybox = box()
mybox.length = oneMeter
mybox.width = oneMeter
mybox.height = oneMeter
You can also set it using centimeters (“1cm”), millimeters (“1mm”) etc.
DotNet
Dotnet is a useful way to add libraries in 3dsmax (similar to Python) so you can use existing functionality from dotnet. Basically we can use things such as regex (for parsing text), download/upload data and many other cool things which are not available in maxscript without it. Lets use a dotnet regex for changing filenames. This example can create a type of bitmap replacer or similar for when you want to change all the textures in a material to match the name of the Object.
EXAMPLE:
We create a box called “Sofa” and assign a Physical Mtl to it.

Then we want to:
- Find the location of our textures (eg. C:\temp)
- Change the name of the material to match the box name
- Collect the textures from the directory that match the name "Sofa"
- Put them into our material

First lets find out where these go in the Physical Mtl, so place a Checker map or something into your “Base Color” slot, your Reflection “Roughness” slot and any others you require. You will see in the maxscript listener where they go.
OUTPUT:
meditMaterials[1].base_color_map = Checker ()
meditMaterials[1].roughness_map = Checker ()
So as an example this means our obj.material.base_color_map is where we need to add our first texture and so on. Lets build the script.
SCRIPT:
allTextures = for f in getFiles (@"C:\temp\*.*") collect f
objName = ""

fn findTextures pattern =
(
    -- Create Bitmap node
    newBitmap = Bitmaptexture()

    -- Found variables from regex search
    foundTexture = ""
    bitmapName = ""

    -- Dotnet Regex
    regexPattern = ("(?i).*" + objName + ".*" + pattern + ".*")
    regex = dotnetObject "System.Text.RegularExpressions.Regex" regexPattern

    -- Iterate through each file in the directory
    for f in allTextures do
    (
        -- Extract the filename from the full path
        fileName = getFilenameFile f

        -- Check if the filename matches the regex pattern
        if regex.isMatch fileName then
        (
            foundTexture = f
            bitmapName = fileName
            -- Exit the loop as soon as we find a match
            exit
        )
    )

    -- Set the filename to the found texture
    newBitmap.filename = foundTexture
    -- Change the bitmap name in the material editor to the found bitmap name
    newBitmap.name = bitmapName

    -- Found bitmap
    if newBitmap.filename != "" then
    (
        return newBitmap
    )
    else
    (
        -- Remove Bitmaptexture() node if not found
        newBitmap = undefined
    )
)

-- Main (Run the above for selected objects)
for obj in selection do
(
    -- Set material name to object name
    objName = obj.name
    obj.material.name = objName

    -- Find textures in directory and insert them into the material
    obj.material.base_color_map = findTextures "Base"
    obj.material.roughness_map = findTextures "Rough"
)
)

You will notice we dont even need to type the full word BaseColor or Roughness, this gives us some flexibility for users who choose to change the formatting such as lower/upper case, BaseColor/Base_color, Metal/Metallic/Metalness etc.
You could also use built in maxscript functions such as matchpattern for this small demonstration, however file names can be complex with multiple underscore’s or other characters so we can can utilize a powerful dotnet object like regex for complex string formatting or interpreting JSON data. Since regex patterns can be complex make sure you do test prints so you are sure your patterns are matching as you go. AI can be useful for building regex patterns as well if you struggle with regex.
Also just remember when replacing textures that are not a “Diffuse” or “BaseColor” you will also need to set the gamma to 1.0 for those textures when you load them in. That’s not apart of this Dotnet topic so ill leave that one for you to work out 😉
Connect VSCode to 3dsmax
This generally is easier to script in as you have intellsense and VSCode tools. Another handy thing is vscode is at any moment you can right click on a variable and go to the maxscript docs for that object.
Follow Paul Neals video here, it has quite detailed instructions on how to get 3dsmax and VSCode connected.

Leave a comment